Do you think that website speed is a secondary matter that can be looked after later? If you do, it’s high time to give it a thought again! A conscious look into the statistics would clear the clouds. Do you have any idea of the outcome for a one-second delay in page loading time? It will yield 11% reduction in the page views, 16% reduction in the customer satisfaction, 7% damage in the conversion. So, you can assume how every second counts. A few seconds would have a massive impact on your engagement with customers and eventually, conversion. This makes it certain and significant to have a fast site that not only results well in Google ranking but also allows you to keep your bottom-line profit high.
Can You Define Good Loading Time?
It’s always a smart idea to have an idea of the goal you are going to reach before you start your journey. The same applies to the website loading speed optimization. Prior to optimizing your website loading speed, you should set a goal of the website loading speed you want to achieve.
Well, this process can be difficult if you have no idea of the definition of an acceptable page loading speed. According to Google, the best page loading time should be three seconds. But unfortunately, most of the websites do not meet the standard in line with the recent benchmark report findings!
During a recent analysis done on 900,000 mobile ad landing pages ranged across 126 countries, Google found that 70% of the web pages took nearly 7 seconds to display the above the fold visual content!
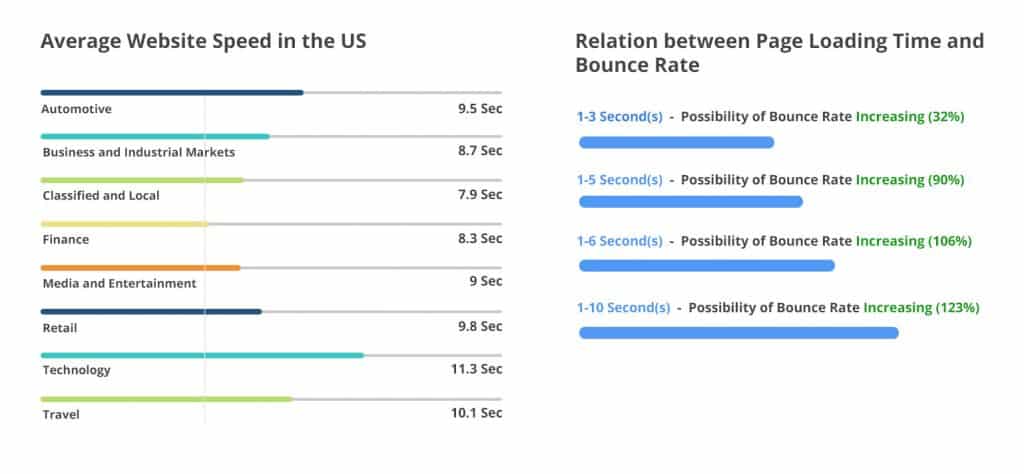
The average loading time for a mobile landing page is 22 seconds but it’s also a fact that 53% of the visitors abandon a mobile site if it takes more than three seconds to load. Furthermore, the probability of bounce rate increases to 123% when the page loading time extends from one to ten seconds.
So, it’s true that there’s a lot of works to do for making a website up to the mark in Google’s eyes but the upside of the matter is when you successfully do that, you are about to experience a remarkable growth in user experience.
How Does Website Speed Optimization Influence Conversion?
Every new to experienced SEO company is working at a rapid pace on website speed optimization; so, there must be some good relationship between your website loading time and conversions! Well, there is a deep connection, and you would be astounded to know about the statistics that almost 47% of the consumers would expect your website to get loaded within merely two seconds or less! Moreover, 40% of those individuals would leave your site if it takes three seconds or more to load which also means that you are losing half of your potential clients even before they visit your site!
When it comes to the people who bear the pain of sticking to your site, it’s highly possible that they would not come back to your site in the future! In fact, a survey states that 79% of the consumers said that they would not return to a site with such poor speed. So, you can see that the poor loading speed directly affects the conversion both directly and indirectly.
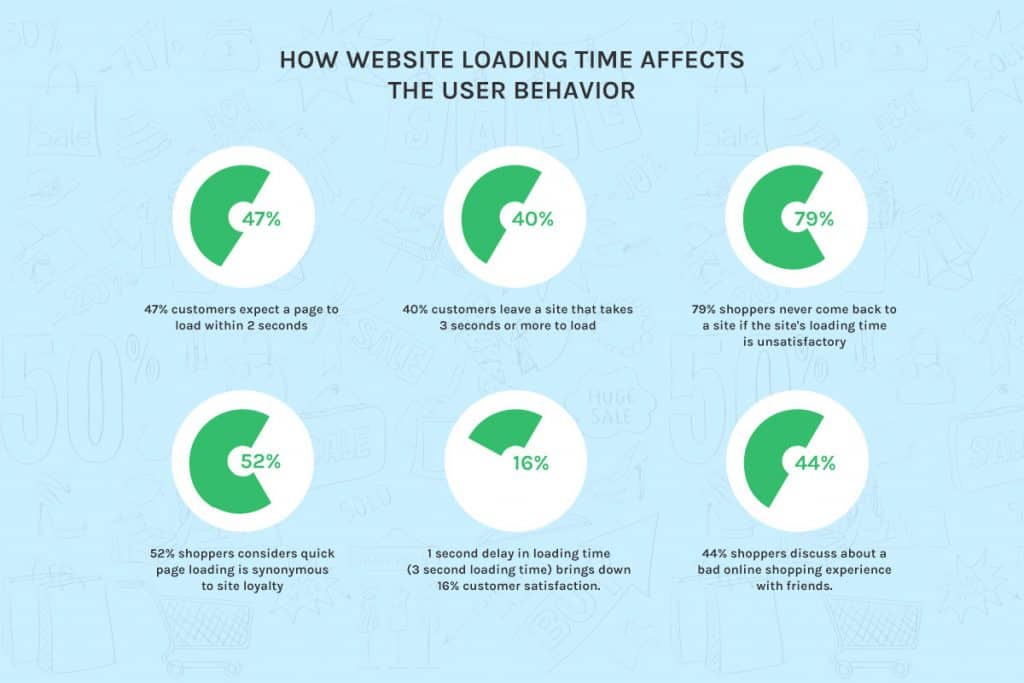
In that survey, the fact also comes to the spotlight that 52% of the shoppers consider the fast site loading time is equal to their site loyalty and 44% shoppers stated to inform their friends about the poor site performance. One more thing that came into the limelight is that the one-second delay in the loading time is capable of decreasing 16% customer satisfaction.
One of the best examples of improvement in revenue and conversion through page loading speed improvement can be Walmart where it was clearly displayed that a faster website would always increase the conversion. Below are the results Walmart got after successfully completing their website speed optimization.
- 2% increase in the conversion rate for each one-second improvement in the website loading speed.
- The incremental revenue grew up to 1% for every 100 Milliseconds of improvement in website speed.
So, it should already be clear to you that each second of website loading speed has an incredible impact on the conversion rate and revenue of your website. But if you are still not convinced, here are two of the biggest names in the internet world and their stories of suffering from the slow loading speed which can make you understand the requirement for a fast loading website.
Google, the search engine hulk of today’s world, once faced a 20% traffic drop due to an increased five-second loading time. On the other hand, the eCommerce titan Amazon also faced “substantial and costly” reduction in revenue when their page loading speed delayed with an addition of 100 Milliseconds during an A/B Test.
How Does Website Speed Affect the Visibility?
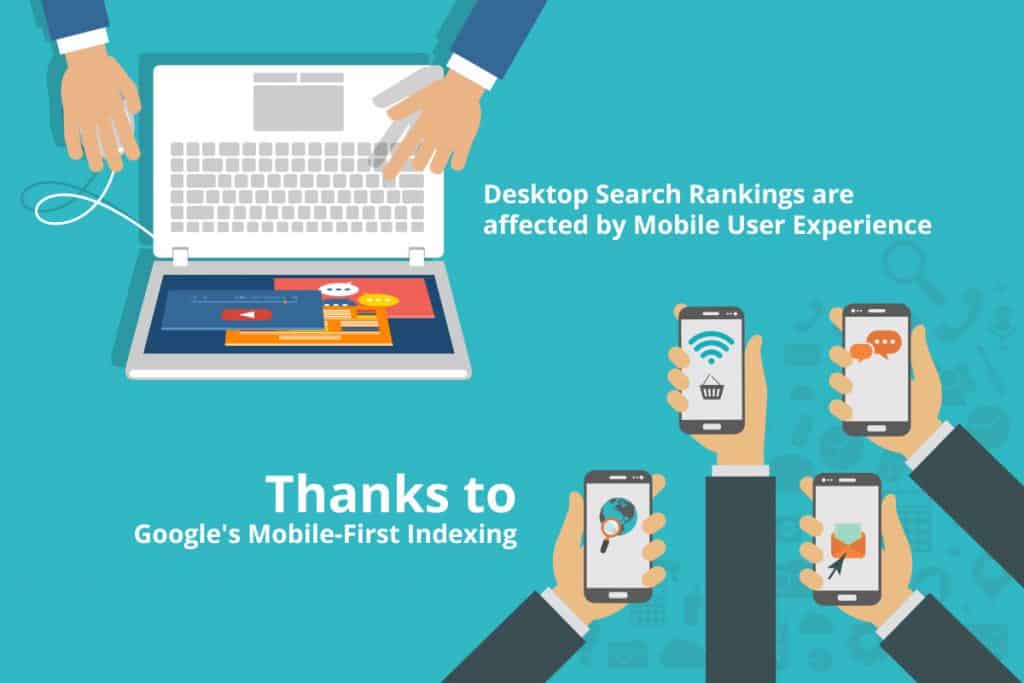
Since Google has become too cautious about the website ranking and the search engine is considering the website loading speed with the utmost importance, your website loading speed would determine the ease of users when it comes to finding your site. The concept of fast loading website has become especially important with Google started rolling out the mobile-first indexing that focuses on ranking the websites based on the mobile versions of the pages.
In the year 2015, the desktop searches were outnumbered by the mobile searches and the mobile searches only seem to grow over the time. This also denotes the fact that Google is going to cater the best experience to the mobile users along with the relevant search results. Also, the mobile users would not be directed to such a website that does not load fast or function well on their handy mobile devices.
This incident ensures a considerable amount of attention paid to the mobile user experience when it comes to the search engine rankings, even in the desktop search result. Well, this process of ranking is the exact opposite of the procedure of indexing used before.
Despite the importance of the user experience even before the shift, the indexing and ranking were all about the desktop user experience. This means that even if a website did not meet the mobile standard, it could have been ranked on the first page. But as of now, the whole scenario has taken a mobile turn.
So, it should be easy enough to understand that the reducing the loading time of your website is a critical part of upkeeping and enriching your website ranking and visibility. In a nutshell, if you want to reduce the loading time of a website, you should be producing a website that offers a quick and easy user experience on a range of screen sizes and browsers.
How to Speed Up Your Website?
You would find a boatload of factors which would influence the page loading time of your website. So, you can make use of different aspects in order to improve the page loading speed and user experience of your precious website.
We are going to cover the top 20 practices to have a faster website loading time. Well, you don’t need to worry about the number. You don’t have to follow all the 20 tips. Go through all of them and avail the ones you are comfortable with. So, let’s get into the main scenario without wasting further time.
1. Get the Best Possible Hosting
One mistake that almost every other website owner repeat is choosing a cheap hosting plan for their website. While the cheap web hosting may fit your needs in the beginning, you would require some upgradation along with the time when the number of traffic will start increase on your site.
Mainly, there will be three different hosting options that you would find in the market:
- Shared hosting
- VPS hosting
- Dedicated server

The first one, called shared hosting, is the most inexpensive choice of all the hosting services. You can even get it at a price of peanuts. Basically, while you are availing the Shared Server, you share the resources such as RAM, CPU, and Disk Space with the other websites hosted on the same server.
When it comes to the VPS hosting, even now, you divide the resources of the server with the further websites but the difference is you have your personal separate portion of the resources of the server.
In simpler words, the Shared hosting, VPS hosting, and Dedicated hosting are just like spending your life in an apartment, a condo, and a house. When you stay in an apartment, there are some common properties that are shared by every family lives there. All have access to the facilities.
When it comes to the Condo, you don’t make use of the common places. Rather, you are responsible for some specific repairs and maintenances. Also, there will be fewer residences present in the building just like the fewer sites present in the VPS server.
Now, when it comes to the Dedicated Hosting, it’s like your house. There are no other sites under the hosting service. You enjoy every facility and resources without sharing them with anyone else. But you are responsible for the entire maintenance. So, you do have a larger space with the dedicated hosting but you need to work on the maintenance and technical setup by yourself.
If you want a strong hold on your hosting along with a ton of space, then the dedicated hosting should be the bull’s eye for you. If your website’s traffic level is interrupting the response time of your server, then it’s time to upgrade from the Shared Server to VPS and from VPS to the Dedicated hosting. And as you have already assumed, the pricing would be rising with each upgradation.
2. Minimize the Server Response Time
The amount of time taken by your DNS lookup is one of the biggest factors to determine how quickly or slowly your website or a particular web page gets loaded.
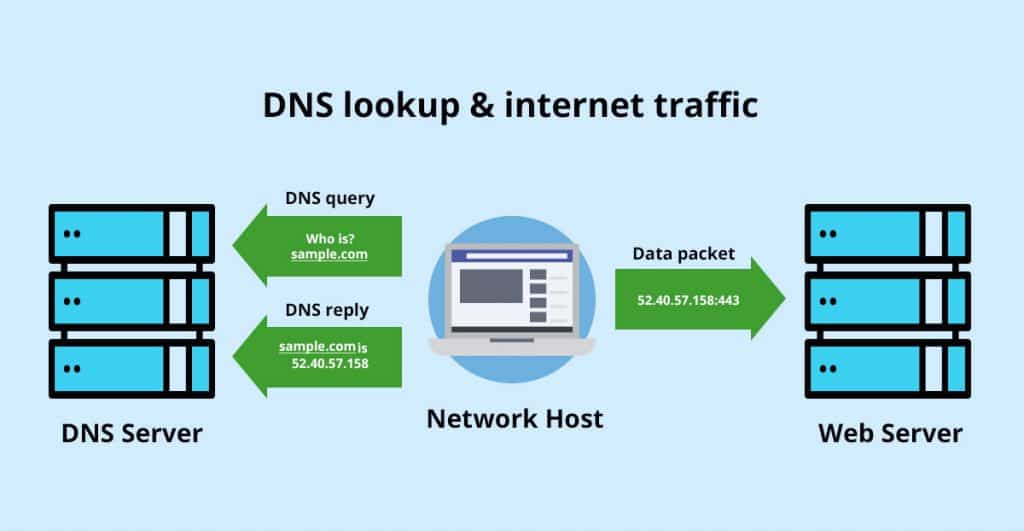
The Domain Name System or DNS is basically, a database contained with the IP addresses and their hostnames. When a URL is typed by the users on their browsers, the DNS server transforms the URL into the IP addresses which are the indicators of the online location. When it comes to the DNS lookup, it is the procedure of locating a precise DNS record. It can be considered as finding a number in the phone book by your computer. For instance, if you want to visit the URL – inltum.com, you would simply type the URL into your browser but it will mean very tiny to your PC.
Then, a DNS lookup will be performed by your ISP (Internet Service Provider) in order to find out the IP address linked with the URL. Promptly, your IP address will be found by the browser which will direct it where to find the website you are currently searching for. The utilization of this step comes handy when the users don’t need to remember the long series of numbers to get into the websites and information on the internet.
The time taken to complete this step would be decided by the speed of your DNS provider. If you don’t find the current DNS provider fast enough, it’s time to switch to another one that may offer you a better speed. Using a slow DNS Provider would make it difficult and time-consuming for your browser to locate the website you are looking for. Whereas the faster DNS provider can accelerate the whole procedure and eventually, let your site load faster.
3. Minimizing the HTTP Request
It has been conveyed by Yahoo that 80% of the overall loading time of a web page is consumed downloading the scripts, images, stylesheets, and other different parts of the page. The HTTP components are made for these on-page elements. So, it can be easily understood that a longer page rendering time would be there with more on-page elements. So, you need to minimize the HTTP requests.
In order to do that, the first step should always be figuring out the number of HTTP requests your website is currently producing. The figure would be utilized as the benchmark. If you are using Google Chrome, then the browser’s developer tool can be accessed and utilized to know how many HTTP requests your website makes.
How to Check the Number of HTTP Requests on a Web Page?
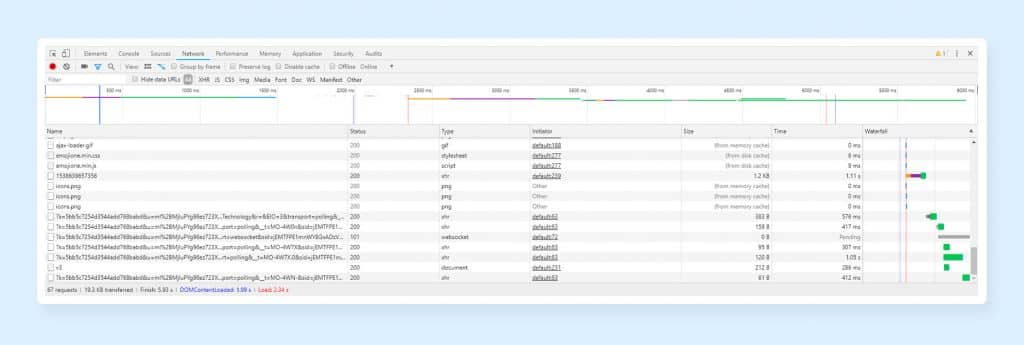
- Right-click anywhere on the page that you want to analyze
- Click on the “Inspect” tab.
- Now, click on the ‘Network’ tab (if you don’t find one, stretch and expand the developer tools sidebar).
- It will display all the HTTP Requests in form of a chart.
- If you don’t see any chart showing up, press F5 and reload the page you are viewing.
This list of HTTP Requests would allow you to see all the requests of your website and you can reduce it according to the necessity and vitality of those requests.
4. Minifying and Merging Files
Since you know (now) how many requests your website produces, you should promptly take action on dipping the quantity. So, you must be thinking where to start from. Well, in that case, the HTML, CSS, and JS (JavaScript) files are the best place to begin.
These are three of the most important files of your website since they are the cornerstones of your website’s frontend. But at the same time, these files are the ones which create the requests each time a visitor lands on your website. Well, there’s a way out and that is our second point. You can reduce the number of requests by minifying and merging the files which will deduct the total number of files and the size of the files.
This aspect is especially significant when it comes to the website builders. When you make use of a templated website builder, they make your job easy to build a website but along with that, you get some hassles – this ease of website development comes with a range of messy codes that are capable of slowing down your website.
What is Minifying?
When it comes to the minification, minifying a file would involve removing the unrequired code, whitespace, and formatting. As your website’s size bulks up with the addition of every redundant code, the elimination of the extra space, indentation, line breaks is highly required. This elimination keeps your website as feathery as possible.
What is Combining Files?
Combining files is just like how it sounds. If your website contains multiple CSS or JS files, you can amalgamate them into one which will lessen the space and size at the same time.
While there are several techniques available for minifying and combining files of your website, there are also numerous plugins like WP Rocket obtainable in the market if you are making use of the CMS like WordPress.
When it comes to your website’s loading speed, the thinner it is, the better it is. Always, remember that the fewer elements your web page would have, the fewer HTTP requests a browser would need to render the page. And we believe you have already understood the final outcome – Faster web page loading time.
You can avail various options for minifying and merging the files of your site. One of the most viable techniques is the WP Rocket plugin if you are using WordPress. This plugin makes the whole procedure immensely easy and simple to perform.
Visit the “Static File” tab once you install the plugin. Now, check the boxes beside the file types you want to minify and combine.
All the JavaScript, CSS, and HTML files can be minified and combined along with the Google Fonts. After doing so, hit the button – “Save Changes.” Now, if you want to have a look at the impact of the action made by you, open the developer tools and reload the page.
5. Asynchronous Loading for JavaScript and CSS Files
Wait, if you think everything is sorted with the CSS and JS files, you are wrong, there’s more to do. Apart from the minification and amalgamation of the files, you can also do the optimization of the way those pages load on browsers.
You can either load the CSS and JavaScript scripts in a couple of diverse ways – synchronously and asynchronously. Now, you must be thinking about the difference between these two ways of page loading.
When a page loads synchronously, all the scripts load one after another. So, the each of the scripts will load one after another. The files would load in line with the sequence they are going to be visible on the web page. Now, when it comes to asynchronous loading, some files of the scripts will load simultaneously.
So, where the profit lies in Asynchronous loading? The asynchronous loading of the pages would certainly speed up your website to the best extent since the browser moves from the top to the bottom while loading a particular web page. When the browser reaches a non-asynchronous CSS or JavaScript file, the loading (of the further elements) will be interrupted and will resume the loading only when the files get fully loaded. Now, on the other hand, if those files were asynchronous, the other components of the web page could have been loaded by the browser at the same time skipping the files that are taking time to get loaded.
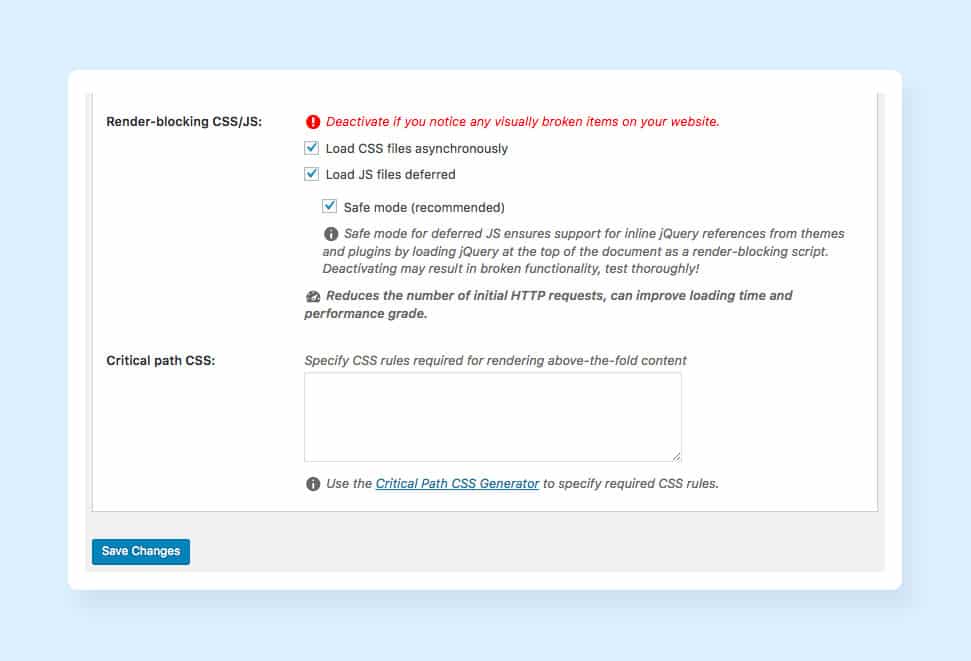
You may use WP Rocket plugin’s same “Static Files” tab where you need to check the boxes present next to the “Render-blocking CSS/JS.”. Now, click on the “Save Changes” button in order to save the settings and then review whether your website loads perfectly.
6. JavaScript Loading Deferring
When it comes to deferring a file, it denotes the prevention of loading the file until the other files have been fully loaded. So, what’s the use of deferring JavaScript files? Well, when you do so, you are deferring the bulkier files like JavaScript in order to make sure that the rest of the lean contents get loaded without any interruption. Now, the question is how to do so. Well, we are mentioning the procedures just below. Have a quick look.
How to Defer JavaScript Loading
- While you are making use of the HTML website, deferring the JavaScript loading can be done by placing a call to an external JavaScript File before the </body> tag.
- On the other hand, when you own a WordPress website, you would be able to avail the above-mentioned WP Rocket plugin in order to defer the JavaScript Loading quite effortlessly. All you have to do is to check the box right next to the “Load JS files deferred” tab, and you are ready to go.
You must be thinking how does it help in speeding up your website loading time. Well, when you will keep the resources away from your critical rendering path, your website’s ‘Above the Fold’ content would get loaded instantaneously which is measured by Google for the factor of ranking and visibility.
7. Minimize the TTFB (Time to First Byte)
Apart from the time your web page takes to get fully loaded, there’s another factor that requires your attention quite specifically – the amount of time your web page takes to start loading!
TTFB or Time to First Byte is the volume of time a browser requires to wait before obtaining the first byte of the data of any web page from the server. The recommended time for a TTFB is less than 200 Milliseconds, stated by the search engine giant, Google.
While most of the website owners and website optimizers focus on the front-end performance aspects, this particular one is a server-side issue. So, how does the whole procedure work?
Every time a user lands on your website through his/her browser, the particular browser transmits an HTTP Request to your website’s server that hosts your site. Between the initial request and first byte of data, there are three steps that need to be completed –
- DNS lookup
- Server processing
- Response
You can monitor the time this process is taking for your website with the help of the Chrome’s Developer Tool or any other third-party tool. Now, there’s a precaution that needs to be looked after. If you are making use of the Chrome’s developer tools, you need to bear in mind that the whole response time can be altered according to your internet connection. It means that the slower internet connection would slow down your server response time.
How to Check TTFB?
- If you are willing to obtain this data through the developer tools, click the ‘Network’ after opening the developer tools. Now, hover your mouse on the first entry listed under the ‘Waterfall’ column.
- This information can also be accessed by utilizing the third-party tools such as WebPageTest which also come for free. The tools like the above-mentioned will let you test your website from the data center.
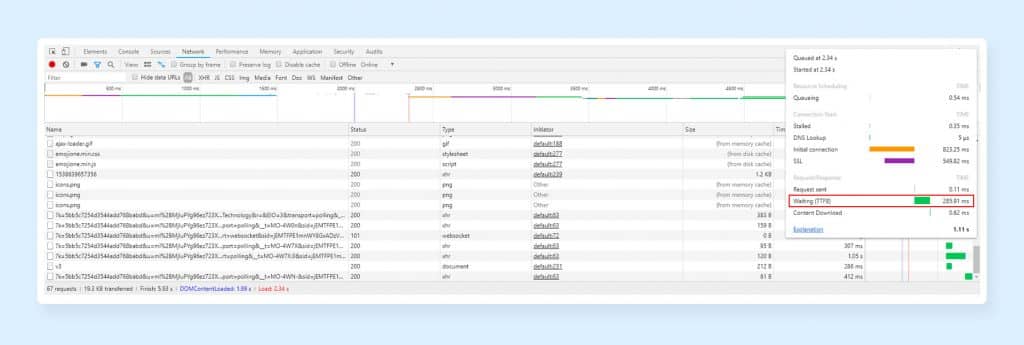
If you see your web page’s TTFB under 200 Milliseconds, your web page is going well. Otherwise, you need to pay attention to the matter as there can be some issues at the very root.
traffic, web server configuration, dynamic content creation, or network issues are the reasons behind most of the most of the issues we face with the TTFB. You have the controls over two of all the factors mentioned above – server configuration and dynamic content creation.
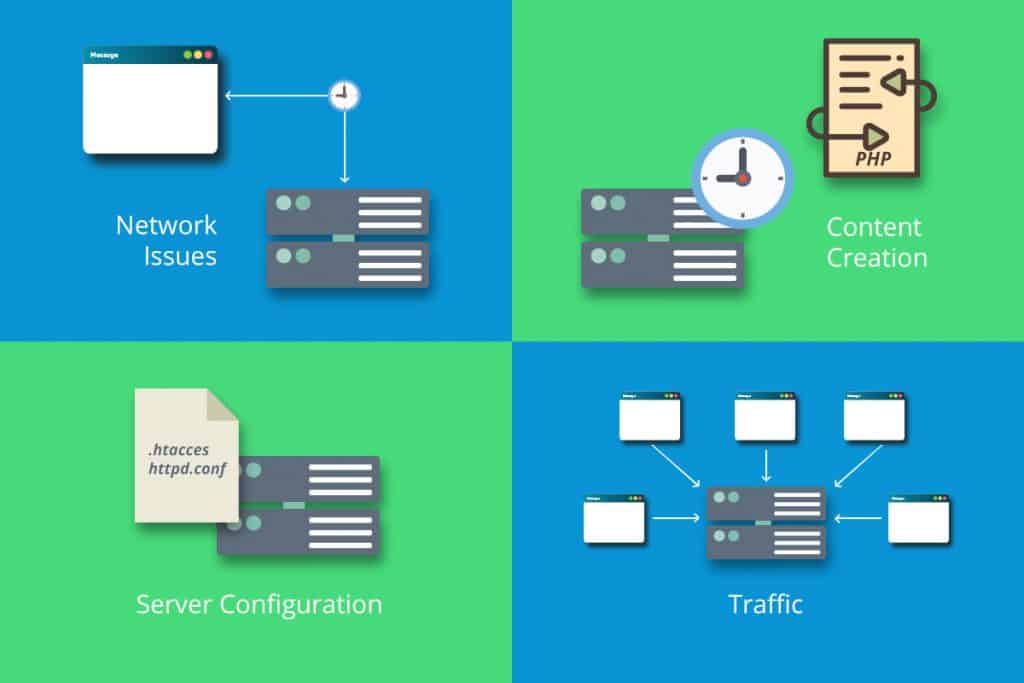
The server needs to create a dynamic file before giving any response when it comes to the dynamic pages. The static pages would not give you much hassle regarding this matter.
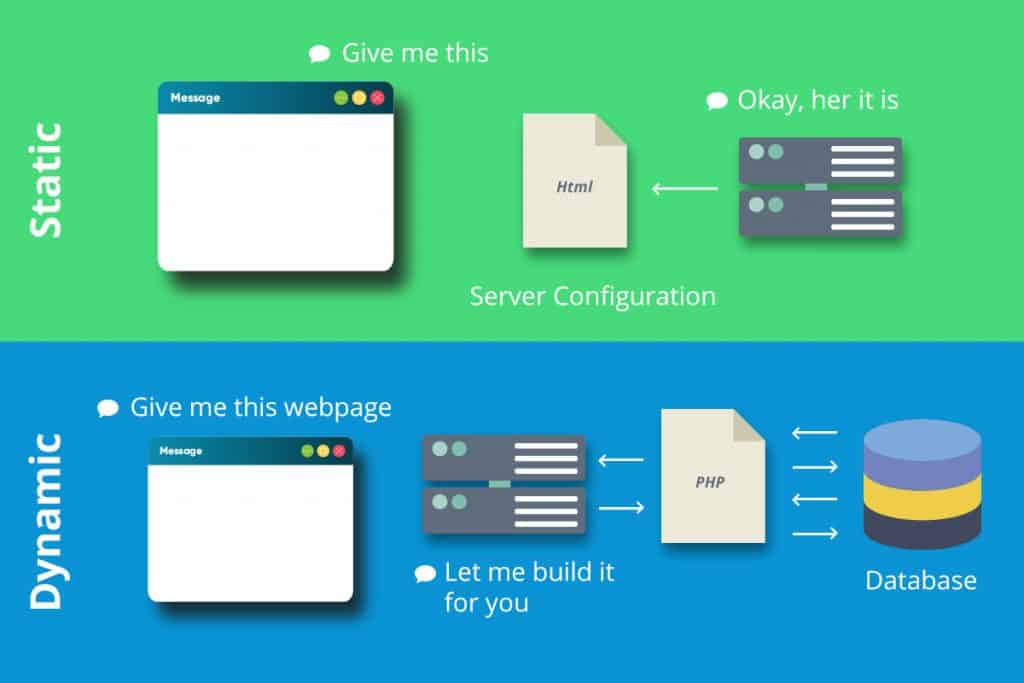
Now, if you own a WordPress website, most probably, you have the dynamic pages. So, they would require interacting with a database to be ‘created’ with PHP prior to they are delivered. The loading time can be reduced by making use of the ‘Caching’ which will be discussed later on in this article.
8. Image Size Reduction
This one is unheard by none. Images play a pivotal role in making or breaking your website loading speed. Images are large files which often slow down a page’s loading speed. But removing the images would not be a smart option for you to avail.
The average conversion for an eCommerce website ranges from the 1-3% which can rise up to 5% for a few sites such as NatoMounts that enjoys an 85% conversion on mobile devices.
Now, you must be thinking why we have mentioned the eCommerce sites. Well, when it comes to the conversion rate on the eCommerce sites (or any site as such), the images play the most crucial role in terms of helpful product images. In a survey, it has been noticed that 66% of the online customers want to see at least three product images before making any purchase online. So, you must have understood the vitality of the images on eCommerce sites.
So, the conclusion can be regarded as images are important but also need to be compressed in order to quicken the website loading time. Despite the fact, surprisingly, 45% of the top 100 eCommerce sites do not contain any compressed images, according to Radware. Thus, it’s very much certain that the site owners need a lot of works to do when it comes to the image compression.
If you analyze your page speed on a tool like Pingdom, you will be able to see how impactful the images can be in terms of the page speed. When you’d visit the “Requests by Content Type”, most of the time, you will be able to witness the ‘images’ conquering the list with the highest number of requests. On the other hand, when it comes to the “Content Size by Content Type” option, the ‘images’ are at the top here as well containing the highest amount of size.
This directly denotes that the size of the images can be compressed to reduce the page loading time to a great extent. A study even showed that 70% reduction in Time to Interact has been seen by resizing 22MB Image to 300KB. The Time to Interact is the time the users need to wait before interacting with the site.
If you are thinking about the way of reducing the image size, here it is – one of the most effective tricks to reduce an image’s size is cropping it to the right size instead of uploading the full image with the original height and width.
Supposedly, you require an image with the height and width of 1080px and 608px and you have picked an image with 5000px and 2000px in terms of height and width. If you upload the original image without cropping and let the system resize it before loading with the height and width parameter, the whole image will get loaded and then the resized image will be displayed. It is surely going to upsurge your website loading speed.
Furthermore, you can compress your website’s images with a range of different tools that can easily be found online. One such tool can be WP Smush which is a WordPress plugin in case you are using a WordPress website.
If you are wondering how to do it, here’s the technique –
You will see an option called, “Automatically smush my images on upload”. Allow it by clicking on the Switch icon placed right beside it. This plugin will be extremely intuitive to resize each and every image file you upload on your site. You just need to mention a maximum height and width; the plugin will do its job and “Smush” the images that exceed the given height and width ratio.
On the other hand, if you don’t run a WordPress site, then the third-party tools like Compressor.io can really be a great help for the image compression. Prior to uploading the images on your site, upload them on this tool and decide whether you want a lossy or lossless compression.
Note: While the lossy compression eliminates certain information of an image (mainly the redundant information) in order to reduce the image size, the lossless compression reduces the file size but the files can be retrieved to their original size when uncompressed.
Now, once you choose the format of the compression of your image files, you will see the information about how much the image file was reduced and you can also download the reduced image file. Now, upload it to your site.
Along with the size of the image, the image format would also play a pivotal role since the file formats can have an impact on the file size. Basically, three image files types are being used on the internet: JPG, PNG, and GIF.
JPG would be the best option that you can avail while using an image. It’s a lossy compression that means that some image data will be lost while saving it. But the differences will be undetectable by the users. So, uploading the JPG files can effectively reduce the loading time without impacting the appearance.
When it comes to the PNG images, they are lossless which means the images don’t lose the data even after the compression. Consequently, the images are larger than JPG and they are remarkably perfect for the detailed graphics such as the Screenshots, Logo, Line Art, etc.
Now, the GIFs should always and only be used for the small and simple graphics within 10X10 Pixels, animated images, and a color palette under 3 colors.
Now, after you have got all the image size and formats correctly, it’s time that you also ensure that the codes used for implementing them are correct as well. You should always pay attention to eschew the use of the empty image src codes. Below is the code for an image on HTML.
<img src=””>
If you embed no source within the quotation marks, the browser would make a request to the actual page itself or the directory of the page. This will lead you to suffer from a redundant traffic on the server and corrupt the user data!
9. Compression Audit
Compression is one of the most effective ways of optimizing the website loading time. Turning your website’s files in the smallest form without compromising the quality should always be your foremost interest. The smaller files will load faster on the internet whenever a user requires accessing your website. Now, where does it lead us to? Lowering the overall website loading time.
The web pages containing a boatload of images and texts will end up being more than 100KB in size or more. This results in slowing down the downloading since it becomes bulky. At the very time, the compression can be practiced in order to boost the downloading speed.
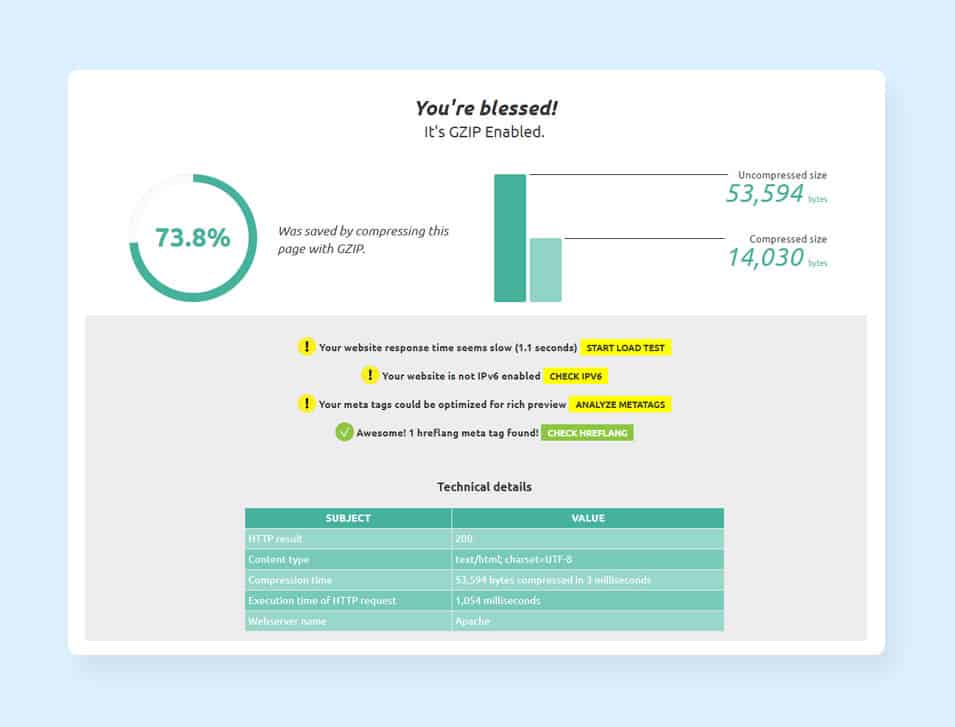
There are various tools to audit your website’s compression level. They will provide you all the necessary details you require for availing the best compression. They would also inform and educate you how the compression would have an impact on your website’s overall size and speed.
You will be able to find your web page’s uncompressed size of which can be utilized as the benchmark to calculate the compression results. Right below your page’s uncompressed size, a section will be there which would convey to you the analysis of how much page size could have been reduced in terms of percentage and size by making use of a tool, called Gzip. The compression with Gzip includes plain text, HTML, XML, CSS, and JavaScript files.
10. Allow Compression
If you want to make your web page faster, you need to make the files present on your web page as small as it can be (of course without sacrificing the quality). If you are looking for the techniques to reduce your website loading time, the compression would be one of the most viable solutions that you can ever avail. While talking about the compression, the Gzip compression is a standard and popular practice.
In order to reduce the file size and compress them, the software application, called Gzip temporarily replaces the strings of similar codes in your text files. This procedure works extremely well with the HTML and CSS since these files have the most number of repeated codes and whitespace.
The majority of the web servers do the file compression in Gzip format by using the built-in routines or by calling the third-party module prior to sending them for download. This very procedure is capable of reducing the download time up to 70%, according to Yahoo. Moreover, most of the famous and well-liked browsers support Gzip, so, you don’t have to be anxious about its acceptance or usability. Therefore, Gzip compression becomes one of the most significant ways of speeding up your website.
If you are in confusion whether or not your website is Gzip enabled, you can check that on CheckGZIPCompression. Here, you just need to put the Web page URL and it will show you whether or not your website is Gzip enabled. If you don’t have a Gzip enabled website, it’s time to make it as quickly as possible.
If you have a WordPress website, both the plugins – ‘W3 Total Cache’ and ‘WP Rocket’ support the Gzip compression. Check the box by the side of “Enable HTTP (gzip) compression” in order to enable the Gzip.
If you are running an HTML website, allow the Gzip inside your .htaccess file.
11. Allow the Browser Caching
When you open a website on your browser for the first time, the components of the visited page are saved on the hard drive of your computer in a temporary memory or cache. So, what does it mean? It means that the next time whenever you are going to visit the website, your browser does not need to send any more HTTP request to the server. Without sending the request, the browser can load the particular cached web page.
According to the former employee of Yahoo, Tenni Theurer, when a web page loads on a browser for the very first time, the browser downloads the page’s images, stylesheets, HTML documents, and JavaScript files before displaying it in front of the users. The time taken for these actions can range approximately to 2.4 seconds while there can be as many as 30 components to download. Now, after the components are stored and the page has been loaded, the following visits would require a few other components to be downloaded.
The result of the test conducted by Theurer ended up downloading just three more components in merely .9 seconds which saved almost 2 seconds of loading time!
As stated by Theurer, 40-60% of the daily visits on your website comes in with the empty cache. Therefore, it becomes one of the most critical aspects that the first-time users experience a blazing speed while landing on your website. But allowing the cache is also important as the returning visitors would experience an extraordinary user experience during their visits afterward. The technique to set up the caching would depend on the kind of the website you own (HTML or WordPress).
How to Setup Caching?
Mainly, there are two types of caching that can be found – Page Caching and Browser Caching. While the Page Caching is a server-side caching that can generate a static, accessible version of a web page with high traffic, the Browser Caching is the client-side caching that stores the data of a website on the browser where the site was opened previously. It makes the loading faster during the next visits on the same browser using the same PC.
For the WordPress sites, there is a plugin called W3 Total Cache that allows the caching quite effortlessly. Here’s how to do it.
Go to the ‘General Settings’ and navigate to the ‘Page Cache’ option after the installation is finished. Now, you’ll find a box beside “Enable”. Check the box.
This easy and simple step and boost up your website’s performance to a certain extent but it’s not the finish-line as there are more to do when it comes to the caching, there’re further things you can do with the help of this plugin.
You can also enable the browser cache in order to save a particular website’s cached version on a visitor’s browser. This means, whenever the user lands on your website using the same browser, it will load faster. In order to enable the browser caching using W3 Total Cache, Follow the following procedure.
- Go to ‘General Settings’
- Navigate to the ‘Browser Cache’
- Check the box beside “Enable”
On the other hand, if you are using the VPS or Dedicated Server, there’s also an option left for you to boost up your website’s loading time – Object Caching. This will fasten your website’s dynamic components. This option can also be found under the General Settings on the W3 Total Cache plugin.
You must be thinking about enabling the option on your shared server as well. Well, let us tell you, it will do the exact opposite to what you want to achieve through the W3 Total Cache plugin! Since the Object Caching is a resource-intensive procedure, it will end up slowing down your website if the site is running on a shared server where all the resources are limited and shared.
After you finish the configuration of the plugin’s settings, the outcome in loading time improvement can be seen instantaneously. The plugin claims to provide a 10x progress in the Google PageSpeed result and a whopping amount of 80% saving in bandwidth after full configuration.
The static HTML sites can have the caching enabled with the help of the .htaccess file.
A few lines of codes can be added in order to convey to the browsers what to cache and the time it should remain cached for. This will allow you to have a control over every sort of file and the time those are going to be in the visitor’s cache.
Generally, the cache lifetime of the static resources should be a week at minimum and the ads, widgets, and the other third-party resources should possess at least one day of cache lifetime.
The other cacheable resources such as image files, CSS and JavaScript files, PDFs, and media files should have a cache lifetime of at least one week to one year.
12. The External Hosting
Now, as you have a fair idea of how to host your website files on the CDN, it’s time that you become aware of the other external hosting platforms which can host the larger files of your website. When you are integrating the videos on your site, these external hosting platforms come in handy.
For instance, if you want to embed a video on your site, you would create the video, edit it, and finally export the file. Quite obviously, you would like to upload the video directly to your website via the WordPress editor or the FTP. This is the very point where you make the most lethal mistake. When you upload the videos on your website it means you are hosting the video on your own server and the video files are capable of acquiring up to 100 MB of space!
Now, it becomes even more hectic when you use a shared server where you are provided with a limited amount of space which denotes that the videos will surely exceed the limit of space allotted for you. What’s even worse is that the large videos may violate the terms of acceptable use set by the hosting provider. Eventually, the hosting account of yours may shut down altogether. Even if your hosting provider allows to upload the large videos, it would certainly diminish the user experience of your site.
Supposedly, multiple users are watching a video on your website hosted on a server which does not have enough bandwidth, the multiple attempts of watching the same video at the same time would force the server to deliver the gigantic file to all of them. This will result in pauses and lags during the playback.
When a user wants to see a video to learn about your company or learn some how-to-do tricks, they will feel utmostly frustrated while the video gets paused on an interval of every few seconds. So, it would not be a smart decision to make.
The only way-out is hosting the videos on the third-party platforms such as Vimeo, YouTube, and Wistia. After hosting the video files, incorporate the videos on your site. The result will be astounding as the whole procedure will save the space, make the loading time faster, and offer a great user experience. But there can be a hassle of choosing the most benefitted platform. So, here we are with a detailed analysis of all the three platforms.
YouTube
YouTube is the first name that strikes our mind when the topic revolves around the online video. This Google product is one of the most recognized online video streaming and watching platforms across the globe. A gigantic figure of more than 1.5 Million of users watches almost 5 Billion videos on YouTube each and every day. This signifies that YouTube acquires more monthly traffic than most of the social networking sites apart from Facebook.
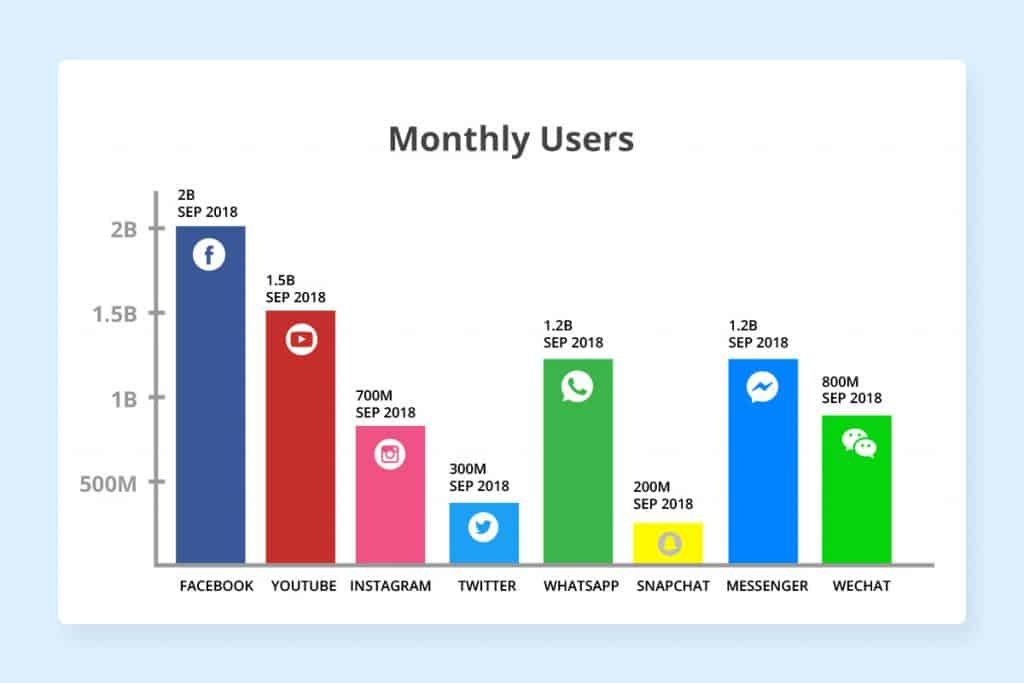
Apart from the fact that YouTube is completely cost-free, there are other potential advantages you can enjoy with the biggest video platform. YouTube receives a humongous amount of traffic so, it can help you reach a larger audience base. So, you can use the platform to grow your brand awareness through the videos you create as well as send traffic to your website.
However, there’s considerably a downside of YouTube! The maximum limit of a video is 15 minutes in most of the cases. If you want to stream longer videos, you have to submit a request to the YouTube authority. So, if you are going to upload the lengthier videos on YouTube on a regular basis, the whole request submission and approval process may seem hectic for you.
Vimeo
Vimeo is considered as the second-most popular video hosting platform right after YouTube. This platform enjoys almost 715 Million views each and every month on an average. Thus, despite the fact that you are going to reach a smaller number of audiences with Vimeo than YouTube, you can still display your videos in front of your audience.

While Vimeo has an upside of containing a more appealing video player than YouTube, there is also a downside of this video hosting platform. Vimeo has the upload limits for the videos! A basic membership on the video streaming platform would allow you to upload 500MB content each week and 5GB in total, they also have three paid plans which range from $7 to $50 and your storage capacity will also range from 250GB to 5TB.
Dailymotion
Dailymotion must have come to your mind when the third-party video hosting platforms appeared as the topic. This video hosting platform also comes with the paid and free option along with the partner program which offers an increased exposure and ad revenue. You can integrate the Dailymotion videos on your site and makes your site less bulky.

The videos hosted on Dailymotion are not ad-free but the video hosting platform comes with one advantage: the ads are played on Dailymotion at the end of the whole video which is rarely seen in the YouTube. Vimeo provides you with an unlimited storage and bandwidth option but the maximum video file size can range up to 2GB and the maximum length can be 60 minutes. However, a downside you would have to face with Dailymotion is its limited Analytics options (even if you have a paid account).
Wistia
Wistia cannot be compared with YouTube or Vimeo as it is not designed for the marketing purpose. If you are aiming at getting searched and found by the users, you are making a big mistake as users do not make use of the site to browse the contents.

But if your videos are being used as a marketing tool, Wistia would be the best destination waiting for you. The platform offers you inclusive analytics which includes all the required data ranging from where the visitors come from, where they stop watching, and where they click! Wistia offers even more than these options mentioned! This video marketing tool also contains the direct Call to Actions to your videos along with the signup option for your email list before video watching.
Moreover, you can also customize the Wistia video player. You can give your videos a branded makeover by changing the colors of your play buttons and other controls according to your brand color. Also, if you are a Hubspot or Marketo user, you will be able to integrate Wistia totally with both of these platforms.
But there’re also some downsides associated with Wistia. The biggest disadvantage with this platform is it allows three videos to be uploaded in the free plan. Afterward, you have to avail the plans of $99+ each month.
After choosing the video platform and uploading a video, it would be immensely easy to upload it to your website no matter which of the above video platform you are using. If you want to know how to incorporate the videos into your site, below is the procedure.
- Click on “Embed” and copy the HTML code provided by the video hosting platform you are making use of.
- Now, copy the code and paste it on the page where you want it to appear.
- If you own an HTML site, add the code to the section where you want the video to show up.
- If you are using WordPress, switch to the “Text” version and repeat the same as you would do for the HTML.
13. Optimize the CSS Delivery
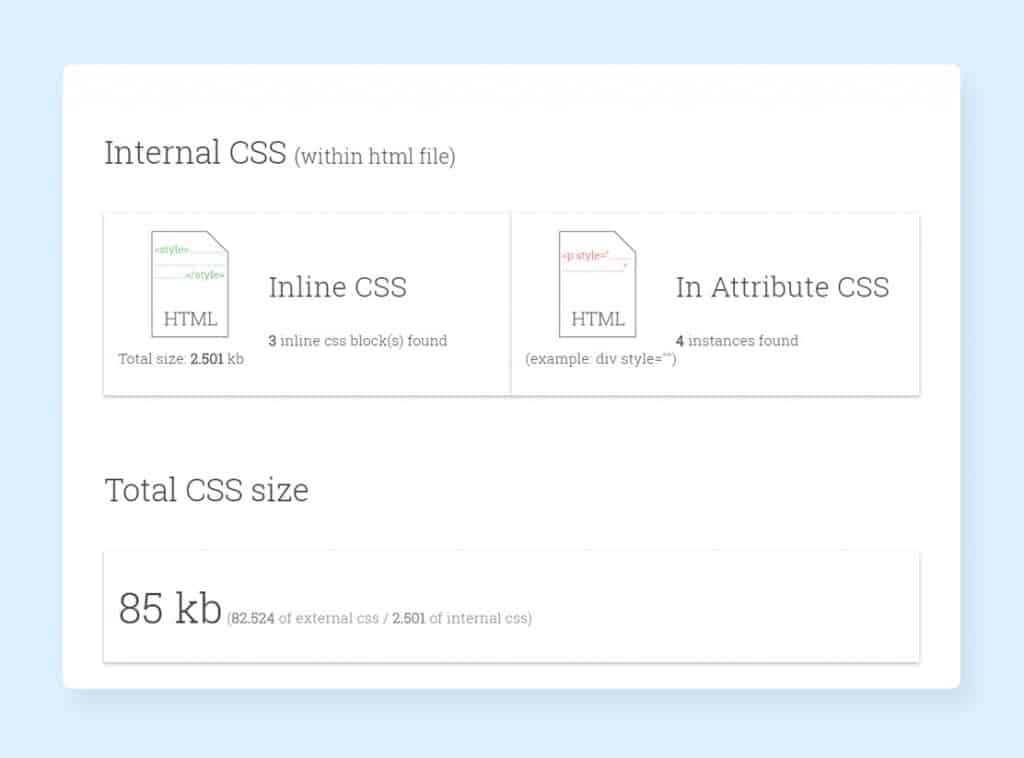
CSS or the Cascading Style Sheet is responsible for your web page’s style requirements. Usually, this information is accessed by your website in either of the two ways:
- In External File: Loads before the page rendering
- Inline: The CSS is present in the HTML document itself.
The head of your HTML is the place where the external CSS would be loaded. The code will look something like below:
<!—Sample styles –>
<link rel=”stylesheet” type=”text/css” media=”all” href=http://sampleURL/style.css />
The inline CSS is nested in the HTML of your page.
As the ubiquitous regulation, you should try to eschew using the CSS in the HTML code. In order to get clearer codes, you should embed all your CSS codes in your external stylesheet. It would nurture the results in two ways: reducing the size of your codes and creating fewer duplications in code.
During the Style setup, you should always aim to make use of a single external CSS Stylesheet. This is recommended as the additional stylesheets would certainly increase the HTTP Requests on your web pages.
If you want to discover all the external CSS files, you may have a look at the “Varvy CSS delivery tool”, it would serve you with all the reports. You need to enter your Website URL and the tool will come up with all the necessary information: how many external CSS files you have and how much space they are consuming along with the total size of all the CSS files.
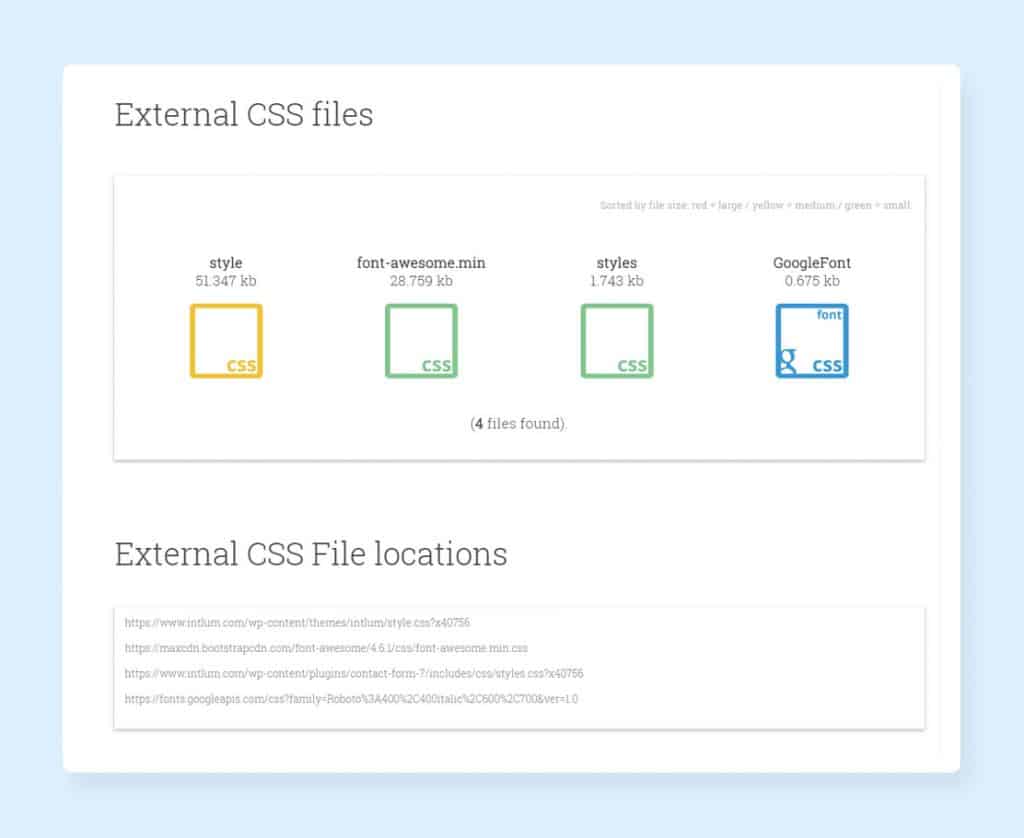
If your site contains more than one external CSS file, each of the files would make your web page’s loading time longer. Having one external CSS file often doesn’t become possible but it is always recommended to combine the files.
The process of combining the CSS files, fortunately, is simple enough and can be executed just by copying and pasting! You just need to copy the components of all the CSS files present on your web page and paste it into the main CSS file. Now, you need to update your HTML in order to eliminate the reference of your old files and reference the new files.
So, where does it lead us? The browsers of your visitors need to download one CSS file rather than multiple which would precisely decrease the overall number of HTTP Requests and the overall loading time of your web pages and website.
After completing the task, you need to check whether your site has any render-blocking CSS issues by making use of the PageSpeed Insights. Under the “Optimization Suggestions”, it will show you the current blocking script sources (if any).
On the other hand, if you are making use of the plugins like W3 Total Cache or WP Rocket, there should not be an issue regarding the CSS files. Now, if you are still facing the issues regarding the Render Blocking, you should always double-check your plugin settings. Otherwise, the Google’s Recommendation for the CSS Delivery Optimization would also be a viable option to look into.
14. Use a CDN
The other networks of servers are also available in order to reduce the website loading time along with the server you use for the hosting. But what’s the need for the other networks of servers? Yes, it is indeed a valid question and the answer is below.
Whenever a user lands on your website, the browser sends a request to the same server hosting your site. This clearly denotes that when your website will receive a high amount of traffic, the time consumed to process each request sees an implausible leap which eventually, slows down the loading time.
Your belief that the high-traffic times are equal to the growth for your business can get hurt if you are using just one server to maintain a boatload of traffic. Furthermore, the users who are accessing your website far away from the location of your server may find difficulties in loading the site. The loading time will increase as the distance is far for the information to travel. It may happen even when there aren’t lots of traffic present on your site.
So, what’s the way out? A CDN or Content Delivery Network or Content Distribution Network is the perfect destination if you want to eliminate the glitch. With the help of CDN, your website can be cached on a global network of the servers. Thus, when a user’s browser sends a request for the files from your server, it is routed to the nearest server.
Let’s say, the origin server of your website is located at Boston but the CDN it uses can host the files on a global prospect. Therefore, if a user from India visits your site, the browsers can download the files of the website from the nearest server (CDN). There would be no difference in the content portion but the site or page would load much faster than it would have loaded from a far distance from the server’s geographical location. This would certainly eliminate the latency issues and loading lags faced by the users based far away from the hosting server.

The improvements obtained by the CDN would differ from one page to another but the pages containing a great number of images would be hugely helped by the CDN. If you are looking for the viable CDN, Cloudflare and MaxCDN would be the two names you should go for.
While the Cloudflare offers CDN and services along with the optimization and security features, MaxCDN is a full CDN service provider which means they only deal with the CDN. For the particular focus on the CDN, MaxCDN owns a big number of data centers as well as focuses solely on the loading time improvement.
Your choice of the service provider would depend on your requirement – whether you want to go for the extended features or your goal is improving the website loading speed and time. The whole setup is an immensely easy process for either of the option you choose. Let’s see.
MaxCDN
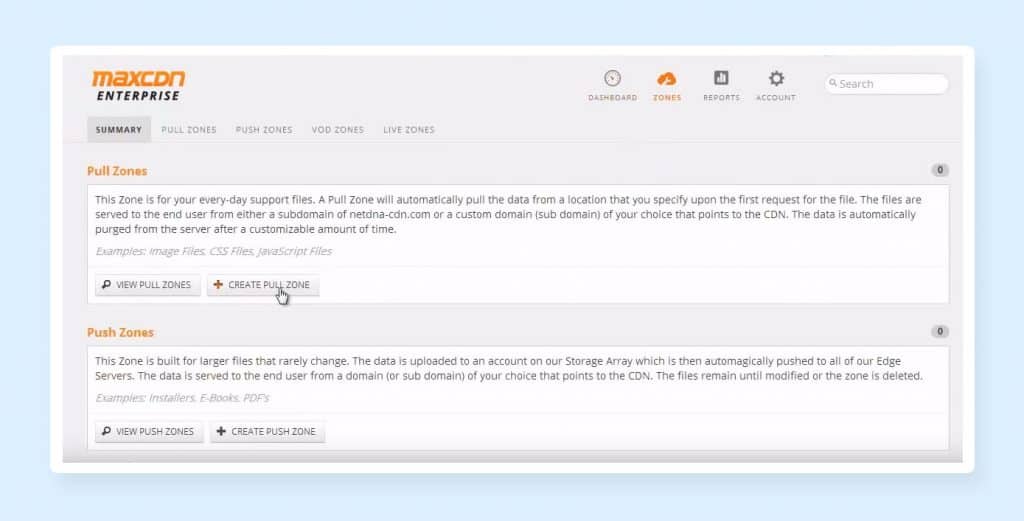
- In the case of MaxCDN, you can start by generating a “Pull Zone”.
- Click on the “Zones” tab on the Admin Panel.
- Now, click on the “Create Pull Zone” button.
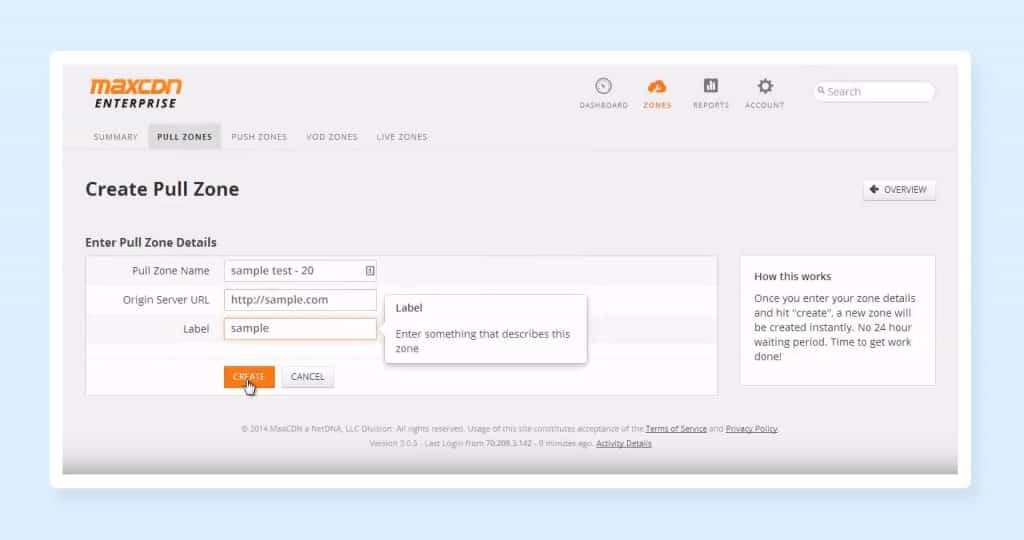
- Enter the Pull Zone Name, Origin Server URL, and Label.
- Now click on the “Create” button and you will receive a URL for your CDN such as cdn.sample.netdna-cdn.com. You need to copy this URL.
- Now, create a “Content Zone” by clicking on the “Manage” button beside the “Pull Zone”.
- Click on the “Settings” tab on the above and put multiple subdomains in the “Custom Domains” field. The subdomains should be like cdn.sample.com, cdn1.sample.com, cdn2.sample.com, and so on. (This naming pattern is used for the ease of memorizing)
- Add up to 7 domains and click on the “Update” button.
- Add the new CDN to your website through the DNS Editor of your hosting provider. The location of the DNS Editor varies from one hosting provider to another. But mostly, it is found under the “Domains” menu. If you use Bluehost, the menu is called “Zone Editor.”
- Now, paste the previously copied URL provided by MaxCDN and set “CNAME” as the type. Also, enter one of the custom CDN domains created by you earlier (such as cdn20.sample.com).
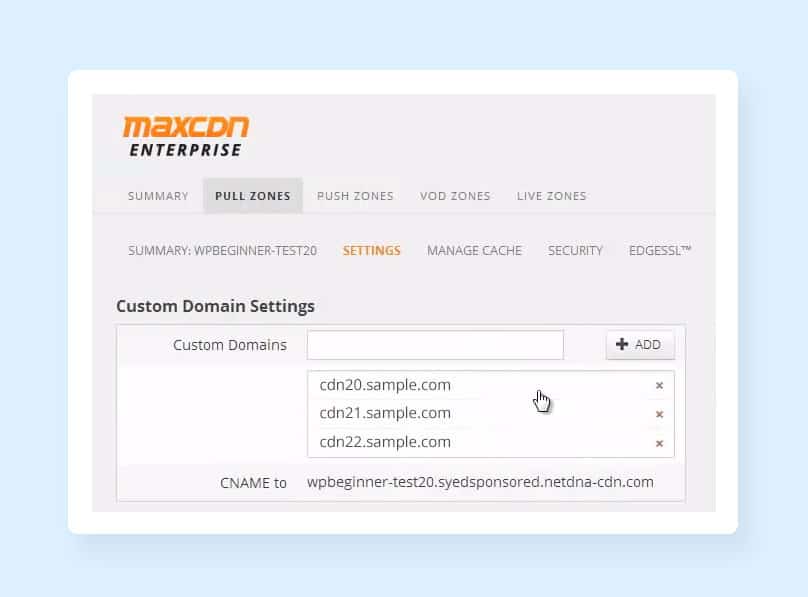
- Now, repeat the process and you are ready to go!
Cloudflare
- When it comes to Cloudflare the procedure is even easier.
- Click on the “Sign Up” button located on the Cloudflare’s homepage and create an account for you. Enter your domain details and hit on the “Begin Scan” button.
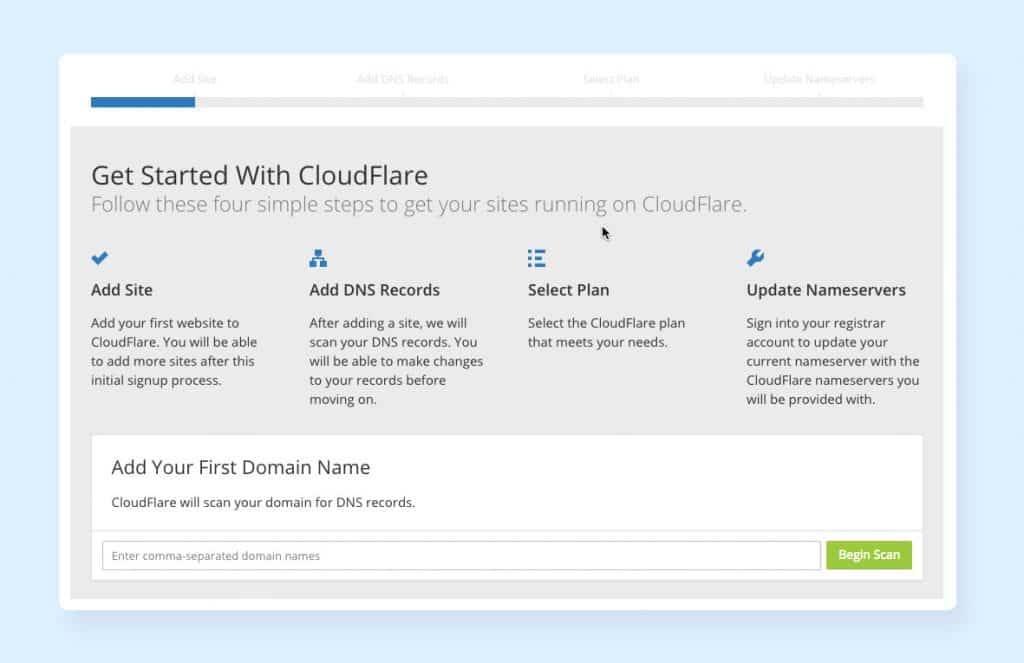
- The whole process will consume one minute of time at maximum and will show all the DNS Records to you which will include the subdomains. Now, the decision will be yours which one to enable and which one not to.
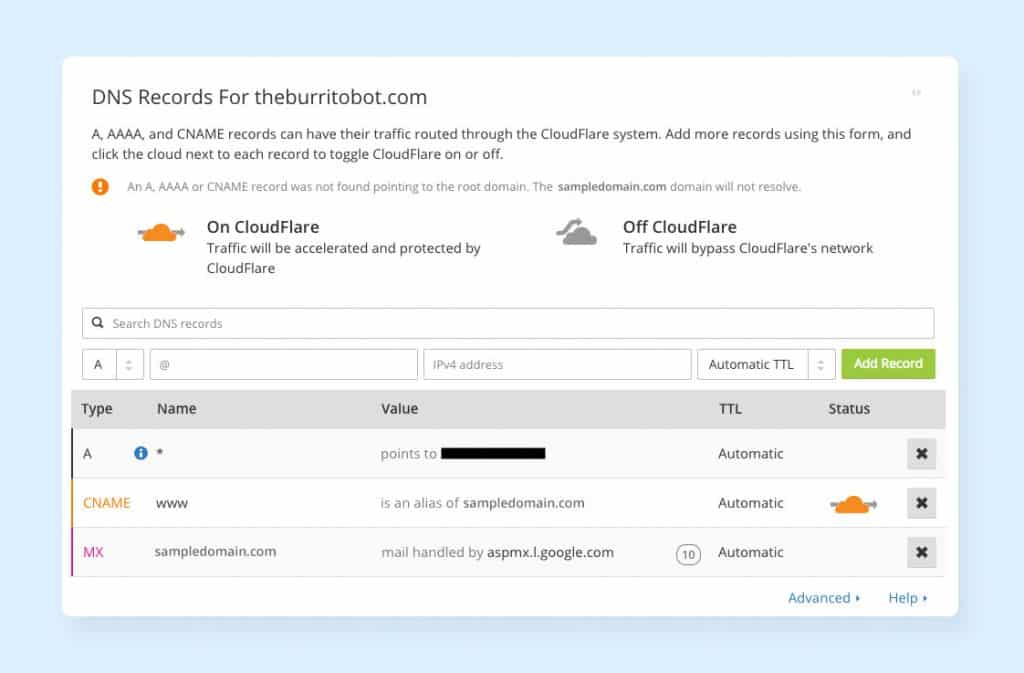
- Choose the plan and click on “Process and continue” button.
- Then your domain’s Cloudflare Nameservers would be visible and you have to update the nameservers for your domain.
- This process can only be completed with the help of your domain registrar. You need to login to your registrar and visit the nameserver records.
- The domain registrar can be located in different positions. Supposedly, if you are using Bluehost, it can be accessed by visiting the “Domain Manager” and clicking on the tab called “Name Server”.
- Now, you need to switch your preference to the “Use Custom Nameservers” and copy-paste the nameserver produced by the Cloudflare.
- After saving the changes, get back to the Cloudflare dashboard in order to confirm that you have done the CDN installation successfully. Now, go to the “Overview” section and there will be an “Active” status to ensure that your CDN is running without any glitch.
- After seeing that, you can be assured that there’s no issue with your CDN.
- Now, one final step is left with the Cloudflare CDN Setup. You have to validate that the SSL records are in the correct place. In order to verify the SSL records’ correct placement, you may click on the “Crypto” tab. There will be one for your root domain and one will be the wildcard subdomain record.
- Now, when everything else is sorted, there’s one final step that needs to be completed with ease is verifying that your website’s SSL records are in the correct place. You need to click on the “Crypto” tab for the verification. There should be one subdomain and root domain record.
- If you still don’t find the records, wait for 24 hours as that is the time it will take for them to be visible. But when they appear, you can be assured that the CDN you are using is serving the secure version of your website just how your origin server works. In a nutshell, it can be said that your CDN is working completely fine.
15. Lazy Loading (Above-The-Fold Content Should be Prioritized)
Along with the recommendation for using one CSS Stylesheets without the inline CSS, there’s another caution you need to look out for. Basically, it’s a clever trick which can be effective to your website and it will make the users think that your site is actually loading fast enough.
You can have the Above the Fold of your website load faster than the rest of the portion. The users would certainly be engaged to the top half of your web page and the rest of the page may get loaded utilizing the time.
This process is called lazy loading and is tremendously useful to enhance the user experience for the pages that have loads of contents below the fold. Let’s say you own a blogging site which has a page containing 30 images. Normally, a user’s browser would require downloading all the photos in order to display the contents. When you are availing the Lazy loading, it would get the above the fold contents loaded initially so that the users do not have to wait to explore the contents while landing on your site.
This strategy can notably reduce the loading time of such posts with tons of images incorporated. If you are using a WordPress site, enabling the lazy loading is so easy that it requires just a plugin to be installed. We are mentioning the best plugins to enable the lazy loading on your web pages and reduce the website loading time.
Lazy Load
Lazy Load is an exceptionally plain plugin which makes use of the jQuery.sonar in order to only load the photos when they are visible on the browser of a visitor. While using the plugin, you just need to install it and activate. Right after that, the plugin would automatically load the image which will be detected as visible to the users.
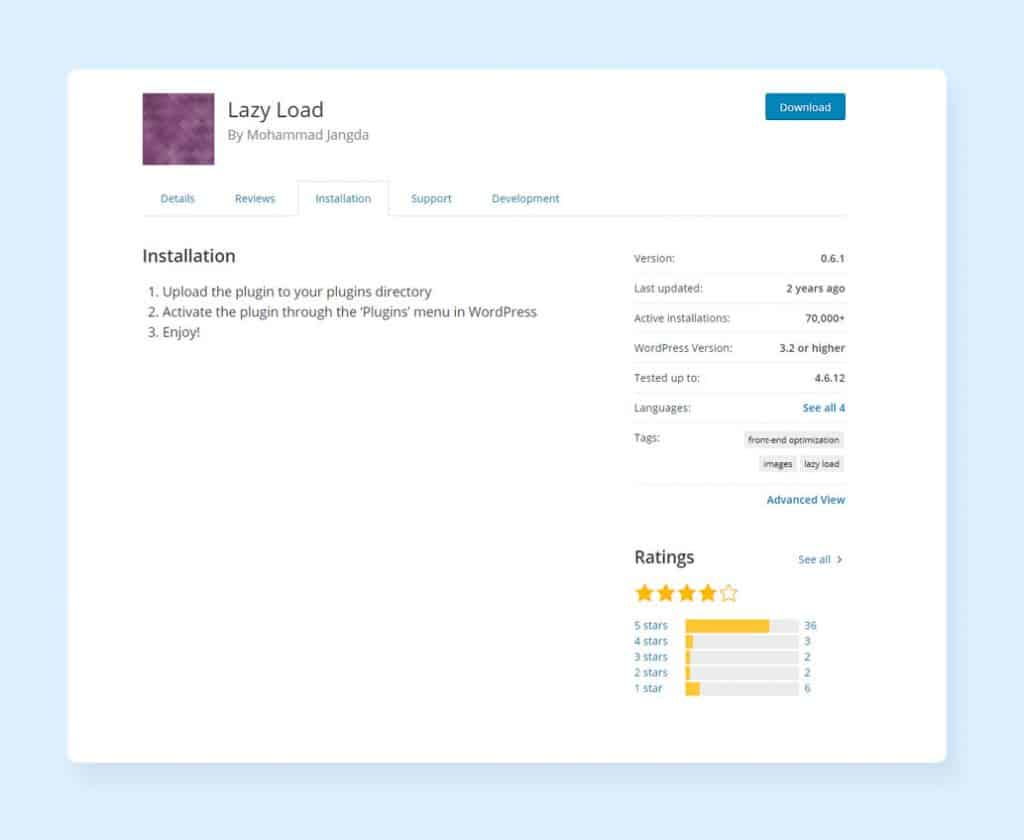
There’ll be no settings or customization option in this plugin to experiment with. This can be a good or a bad thing for you depending on the preference you have. This is the destination for a fast and simple solution to reduced website loading time.
BJ Lazy Load
BJ Lazy Load comes right after the Lazy Load. It is also a simple WordPress plugin but it comes with a few more customization options.
You would be able to determine which type of content would lazy load. The content types include the options such as Content (text content), images, gravatars, iframes, and thumbnails. You would also be equipped to provide the placeholder for the images that are not loaded yet. Also, the images of certain classes can be skipped.

If you don’t want a photo to lazy load, you can code it like below. Through the code, the plugin would understand that you don’t want to lazy load the image.
<img src=”image.jpg” class=”no-lazy”>
You would also be able to enjoy the infinite scrolling with BJ Lazy Load. If you are looking for a plugin that comes with enhanced features and yet simple to use, BJ Lazy Load is the plugin you are looking for.
WP Rocket
The multi-purpose plugin – WP Rocket can also be a viable destination for allowing the lazy loading on your WordPress site. Here’s how to do it.
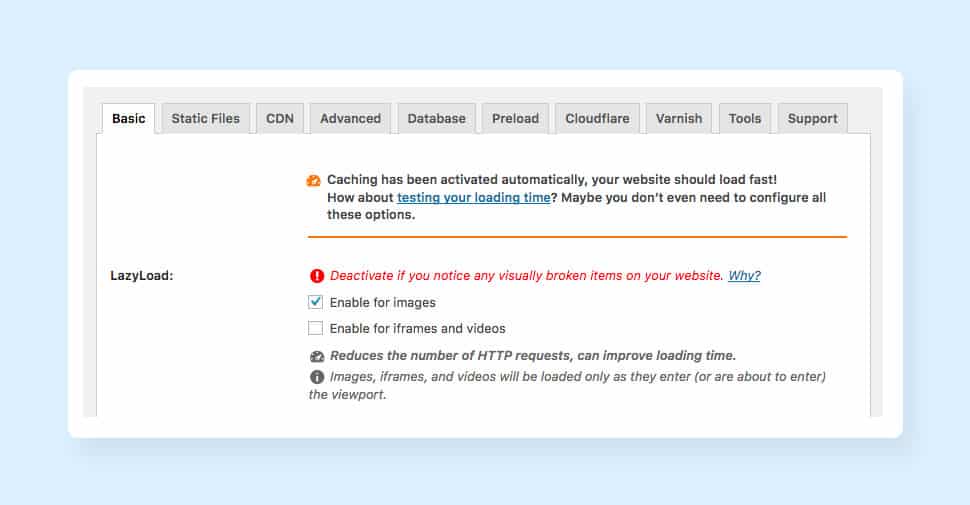
- Open the WP Rocket settings.
- Click on the “Basic” tab.
- You will find a section called LazyLoad. Check the box beside “Enable for Images.”
- Congratulation, you have successfully enabled the Lazy Load feature on your site.
Now, you can make use of some customization options which are present on the LazyLoad section of the WP Rocket plugin.
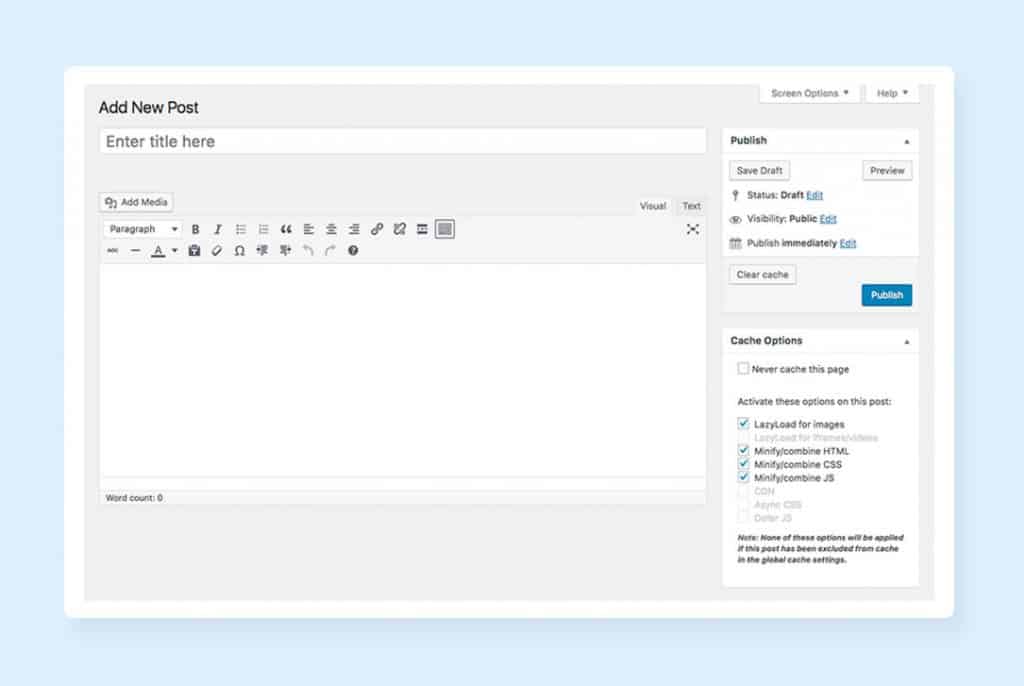
If you want to use the Lazy Load on specific pages, you may do it by disabling the feature on the other pages where you do not want to have the lazy load option. Below is the procedure to disable Lazy Load on specific pages.
- Open the page where you want to disable the Lazy Load.
- Find the “Cache Options” box in the right sidebar by scrolling down.
- You will find a checked box beside the “LazyLoad for Images.” Uncheck the box and save the changes.
The snippets of codes can also be utilized in order to disable the lazy loading option for particular types of pages such as Home or Blog. On the other hand, if you don’t want to enable the Lazy Loading for specific images, “data-no-lazy” attribute will help you achieve your goal.
16. Eliminate the Plugins
As you have already understood from this article so far, the plugin is an important aspect for the improvement of your WordPress site. The plugins can be used to improve the user experience, clean up the codes on the site, add custom functionality, and more which would surely add an immense value to your site.
Apart from the above usefulness, you would also not have to mess with a boatload of codes on your site when you are using these plugins. This particular aspect caters a great user experience. Well, the usefulness of plugins doesn’t end here! They are incredibly easy to install which induces the users to keep adding and installing the plugins on the site without giving it a thought about the feasible hitch.
Yes, there are downsides of the plugins. Installing too many plugins on your WordPress site can cause several issues and some of them are truly lethal. Too much use of the plugins can slow down your site, cause crashes, create security issues, and an array of other technical difficulties which are capable of holding your site back from enjoying the success. Moreover, coping up with the maintenance and updates of such a huge range of application can add to your tediousness.
Even if you don’t have a ton of plugins on your site, it’s efficient to keep your eyes on your installed plugins on a regular basis. Each and every outdated, incorrectly configured, or inefficient plugin would surely have a negative impact on the page loading time. Below are the procedures that can be availed in order to assess the plugins of your website and wipe out the plugins which are harming your website loading speed.
Test Plugins
During the process of your website loading speed improvement, you may avail two different techniques for determining the plugins that are impacting the site speed negatively.
The foremost technique is by disabling all the plugins one at a time! This is certainly a tedious task to perform but the process is surely going to give you all the required data regarding the loading time and how each plugin makes a difference. So, you can mark the plugins which are unnecessarily bulking up your website and increasing the loading time.
Firstly, run a speed test of your site keeping all the plugins enabled. Now experiment with your site by disabling the plugins one at a time. You can check your website loading speed with the tools like Pingdom, GTmetrix or something else of your preference.
However, if you have loads of plugins on your website, the process may consume a great amount of your valuable time. However, the whole process can be shortened by making use of another plugin! Yes, it is pretty much ironical but the use of one plugin can let you dodge all the hassle and time consumption posed by the manual plugin deactivation one at a time and conducting the speed test after each plugin is deactivated.
You can install Plugin Performance Profiler and run a scan on your site. The plugin will show you all the data including the breakdown of each plugin on your site and an overall report. Moreover, you can also deactivate this plugin after making an intuitive use of it.
The Plugin Load Time located at the top conveys to you the total load time of your website’s each and every plugin, the core of your page, and the theme you are using on your site. This particular feature will help you find out what is wrong with a specific slowly loading web page.
Also, there’s an option to keep the detailed history of your scans on the plugin which would help you track down all the issues if you ever run into any problem in the future. You would also be equipped to deactivate and delete a plugin that seems to slow down your site.
One of the surefire plugins to look for here is the Contact Form plugin. So, if you have a Contact Form plugin, it’s time to uninstall that. A great number of website owners believe that installing a contact form plugin is the only way of adding a form on the site. But one thing that you need to know is that most of the themes, nowadays, come with a built-in contact form functionality considering the immense popularity and use of the forms. This also eliminates the need for availing an additional Contact Form plugin.
So, if you find that the Contact Form plugin that is currently in use is adding to your website loading time, you should always have a look whether or not your WordPress theme comes with a built-in option in terms of the Contact Form. If you have, don’t think twice to delete the plugin.
Recognize the Overlaps in Functionality
In most of the cases, all the plugins installed on your website serve a clear purpose and get an important and specific job done. Therefore, it seems quite clear that uninstalling or deactivating the plugins may not be the best option even if your site is loading slowly for them.
So, you must be very anxious about a way out! Well, there is an option to get rid of this hassle. You should always look for a multi-purpose plugin that can execute multiple tasks. Thus, you would be able to uninstall and delete a lot of plugins that serve an individual purpose.
For instance, we can mention the WP Rocket and W3 Total Cache plugin. Both of these plugins are hugely helpful for reducing the page loading time and they can also do different jobs. Now, it would be an unwise choice to have both of these plugins installed on your site since they serve the similar (or same) purpose. This would only make your site heavier and would have a negative impact on your website loading speed.
If you want to evaluate both of these plugins’ performance, you can install them both and evaluate their features. Once you find each and every feature (or most of the features) of one plugin more useful than the other and serving your purpose, you can keep the plugin and uninstall the other one.
Delete the Plugins that Perform the Manual Tasks
If you are capable enough and possess enough experience, you can cut off the number of plugins by doing the job by yourself. For instance, if you consider the use of a plugin for embedding the Google Analytics Tracking Code to the header portion, you can surely be assured that the plugin can be deleted if you are knowledgeable enough to incorporate the codes by yourself. While the plugin comes handy for the individuals with little coding knowledge, the experienced people can certainly cut off the plugin and boost up the website loading speed.
When it comes to the incorporation of the Google Analytics Tracking code, you can avail the Insert Headers and Footers or a similar plugin which would allow you to simply copy your Google Analytics code from your website’s dashboard and paste it on the plugin where the header tag is edited. On the other hand, if you don’t have a plugin for editing the header and footer section and don’t want to install either, do it manually by visiting the website’s FTP.
Worthless to mention that working with the FTP requires a lot more know-how of the technology and coding. But if you do have the capability, you can re-upload the file right after just copying and pasting the code. And you are ready to use the Google Analytics on your site without involving any plugin!
One other common plugin that’s witnessed in almost every WordPress site is the font plugin. Basically, these font plugins make it immensely easy to change the font style on your site. But did you know that you can eliminate the use of the font plugins by employing a few lines of codes?
Visit Google Fonts where you would discover a range of different font styles. Choose the one you want to go with and find the HTML and CSS codes under the “Embed” option. Now, copy the codes and paste the HTML code to the header and the CSS code to the CSS Stylesheet portion.
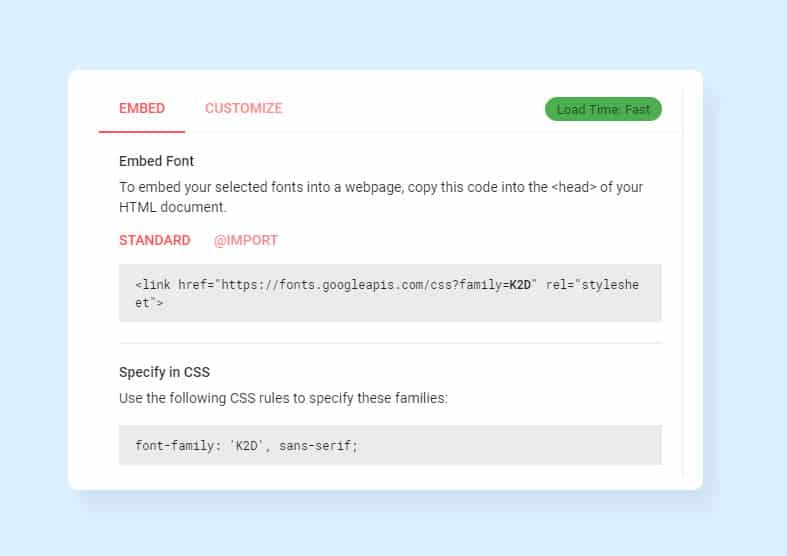
This way, you can add any number of plugins on your site and everything is customizable without any involvement of a plugin.
17. Decrease Redirection
When you move or delete a particular page on your website, it’s important to fix the issues associated with the broken links. And Redirection is the finest way to get the job done. If you don’t use redirection, it would create broken links for the deleted or moved pages as well as show a 404 Error message to the website visitors. It would not be appreciated by Google and your users. So, having the moved or deleted pages redirected is a viable option for the website owners.
But too many redirections are not good for your website’s health either! That creates the additional HTTP Requests and the requests would surely have a negative impact on your website’s loading time, especially, on the mobile devices. We believe you know how much Google prefers the mobile devices nowadays!
Thus, the whole scenario leads us to a conclusion of having the redirections as fewer as possible. According to Google, the redirections should be eliminated permanently. However, it seems quite unrealistic to eliminate the entire redirections from any website. But there’s always a room for improvement.
You can jumpstart the process by having a great tool, called Screaming Frog, utilized. This tool will help you identify each and every redirect of your website.
- Download the tool on your PC and run a site scan.
- Now go to the column, called “Status Code.”
- You will find all the 301 redirections of your site.
Now, evaluate whether all of these redirections are serving a valid purpose and also, discover their accomplishments.
This opportunity will allow you to recognize the redirection chains or the redirections that point to other pages which are also redirected. All of the mentioned create the unnecessary HTTP Requests which would be lethal for your website loading time. In case you find any redirected chains, you should always redirect all the redirected pages to the most recent page by accessing and editing the .htaccess file.
18. Mobile Page Speed
Nowadays, it is truly important to keep your eyes on your website’s speed on the mobile devices along with the desktops. You should always pay attention to the mobile devices as much as you pay on the desktops in order to match up the world where most of the online activities are done through the mobile devices.
Also, we have mentioned earlier that the mobile user experience would have a great impact on your website’s ranking on the search engines. Moreover, it should be your priority to serve the best experience to the millions of mobile users accessing your site through their little devices. If you fail to cater a fair user experience to them, your site is not going to shine at all! Thus, the mobile page speed is an unignorable aspect when it comes to your website’s success.
When it comes to testing your website’s mobile page speed, Google’s Test My Site would be the most legitimate and resourceful avenue you can ever step on. You can audit your mobile page speed here with the utmost accuracy and help.

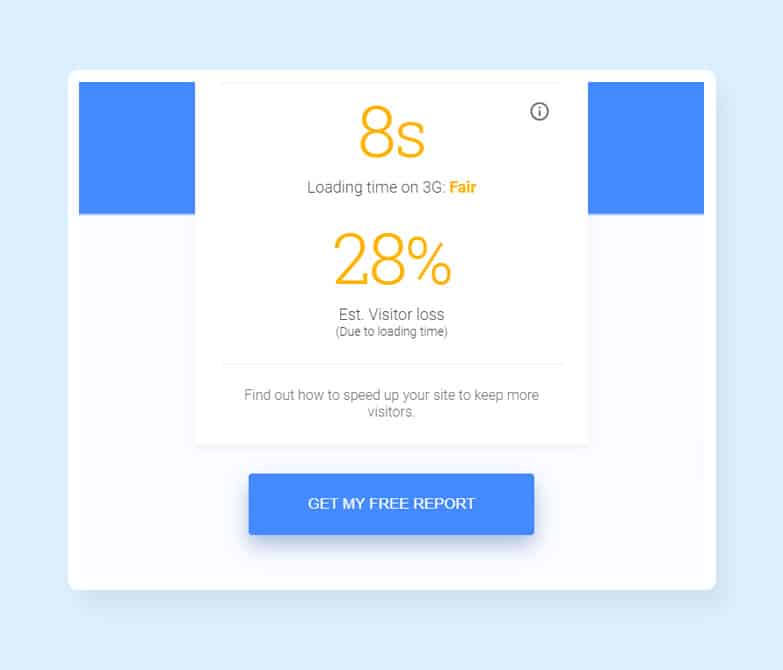
In order to start auditing your site, enter your website URL on the given field. Automatically, it will start fetching your website details and auditing the speed and other aspects of your website’s mobile page. After a while, you will get the results.
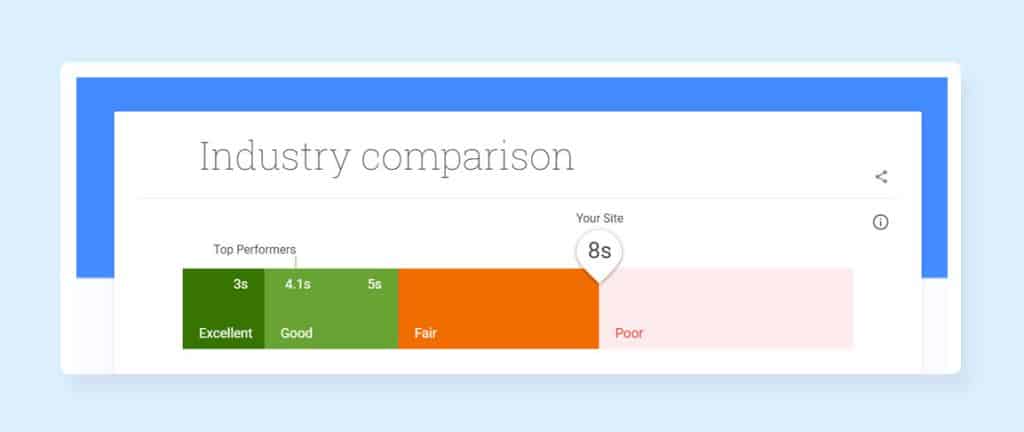
Firstly, you will see the results where your website’s average loading time on 3G will be displayed. Along with that, you will also find how those results stack up to the suggested practices. Moreover, the tool also displays the estimated loss of visitors due to your loading time! So, if you see a startling number, it happened due to the slow loading time.
Also, the industry comparison feature provided by Google lets you compare your business and discover where it stands against the other businesses existing within the same industry. Considering the fact that most of these websites (if not all) are your competitors in the business, you’d obviously want to climb up to the top of the industry.
If your website speed is not near where it should be, it may look like a lofty task but along with the changes you make on your site as per our suggestions in the post, you would gradually move towards the top of your industry.
19. External Scripts should be Reduced
As mentioned above, the fewer requests made to the server denotes a better page loading time. Despite the fact that the CSS and JavaScript files are mainly responsible for the external scripts, they aren’t the only ones. Therefore, it should be clear to you that eliminating the others may also have a great positive impact on your website loading speed.
There might be several common third-party integrations present on your site which may not be considered by you on a serious note. All the external scripts that are adding requests can be viewed and recognized by accessing the network tab in Chrome’s Developer Tools.
An example would clear the clouds in your mind. While using the gravatars, you must have noticed that a significant amount of time has been added to your website loading time. On the other hand, if your site has the Twitter integrated for sharing posts, that would also enhance the loading time of your website as that would send an extra number of HTTP Requests to the server.
But we are not recommending to eliminate all of the features as some of them are really useful to your site. So, the final call will be yours. You need to decide which of the extra features are worth the milliseconds that are consumed and which are not. This will decide whether you would keep them or eliminate them.
Once you have the idea of the features that are adding up to your website loading speed, you would help you take firm and informed decisions about the features you wish to add to your site in the future.
20. Monitoring the Speed over Time
In order to improve your site’s speed, it’s a good practice to monitor the change in speed over time. The process should be repeated even after achieving an acceptable page load time. This post must have already conveyed to you that various factors of website speed are there that can be changed at any time.
Thus, when you monitor your website speed on a regular basis, it helps you keep tracking the issues from a very early moment. This results in keeping your site in the best shape possible by eliminating those issues. You will find a range of tools online for accomplishing the task. If you are looking for any website monitoring tool, Pingdom can be a viable alternative. You should make use of the Website Speed Test feature of the platform for the best monitoring on your site.

You need to enter your website URL and select the region where you want to test your website. In case you don’t have any location preference, leave the “Test from” section as default. However, if you do have concerns about the users from a geographical location with a great distance, test your site based on that location.
Once you have made the test, the site will nurture a summary of your page’s performance and loading time which will include the page size, performance grade, number of requests, and loading time along with some other information. The information showed by Pingdom lets you see an overall evaluation on your site’s speed health. And you can easily track the changes on your site (improvement or deterioration) by having a look at the information.
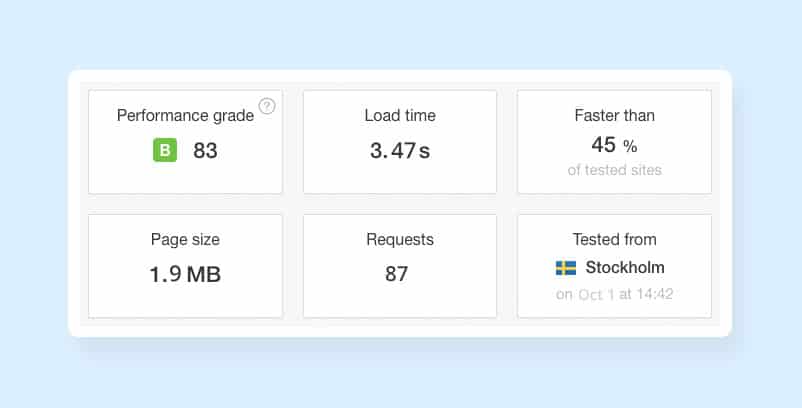
Right under the overall data, you will find a list of recommendations for the improvement of your website performance. So, if you are not satisfied with your website’s performance, have a look at the recommendations to improve your site in the best way possible. What’s more interesting is that all of the facilities discussed above would come under the free plan!
The paid version of this tool contains various premium features such as speed monitoring over time, alerts and uptime monitoring, and much more. All these features ensure that your site runs well and the loading speed constantly remains topnotch.
Conclusion
Undoubtedly, speeding up your website to the point where you want it to be is quite a challenging responsibility. But if you can successfully do that, it’s quite certain that not only your site will improve in terms of speed but it is also going to perform better in terms of user friendliness, ranking, and conversion.
It’s worth mentioning that while each of the above points is important for boosting up your website loading speed, it’s also correct that all of the suggestions don’t need to be put into action at the same time. Run tests on your site and go through the issues found from those tests. Create a hierarchy of the issues ranging from the most lethal to the least. Now, you can begin the optimization by fixing the most problematic issues. If you are not able to fix the errors by yourself, make sure, you are consulting a web design company who can get the job done with utmost professionalism and efficiency.
One more thing that you should always bear in mind is every minor thing matters. You should always pay attention to the small steps and aspects since they can also affect your site to a great extent.